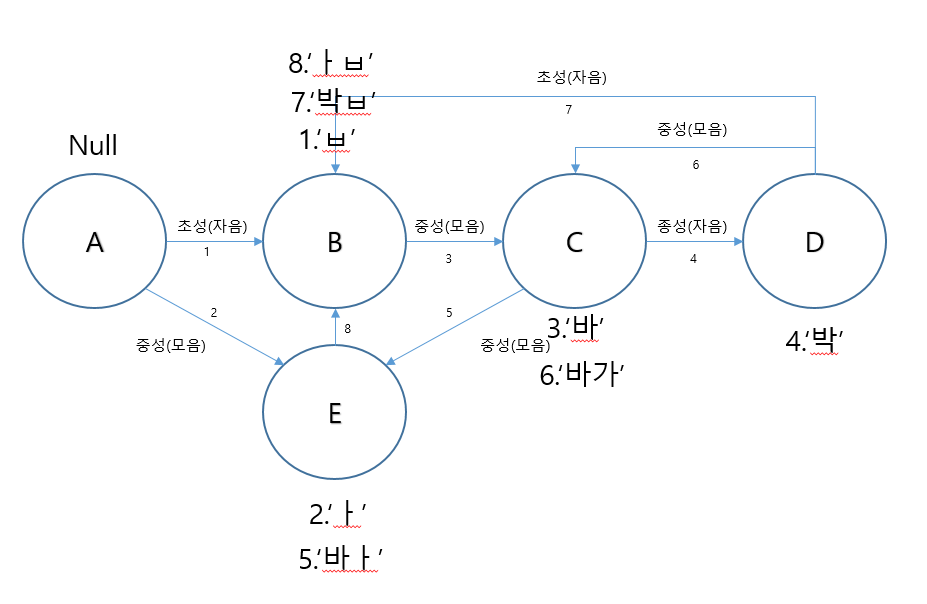
한글 키보드를 제작하면서 만들게 된 Hangul AutoMata입니다.

한글이라는 언어의 위대함을 느끼게 되었던 개발이었습니다..!
우선 첫번째 상태는 아무것도 입력되지 않은 상태로 모음 또는 자음을 기대할 수 있습니다. 여기서 자음이 입력된다면 B의 상태로, 모음이 입력된다면 E의 상태로 이동합니다. B의 상태에서는 다시 한번 자음을 입력하거나, 모음을 입력할 수 있습니다. 만약 자음을 입력한다면 이전 문자를 commit하고 다음 문자로 텍스트를 구성할 수 있습니다(상태는 고정). 그리고 모음이 들어온다면 3번예시와 같은 자음+모음의 C상태로 이동합니다. 마지막으로 C상태에서 자음이 들어온다면 자음+모음+자음 조합의 한 글자가 완성될 수 있고(상태 D), 모음이 들어온다면 이전에 완성된 문자를 commit하고 모음만으로 구성된 E의 상태가 됩니다. 여기까지가 우리가 일반적으로 사용하는 A-B-C-D의 상태변화이고 그림에는 예외상황을 포함한 글자 예시가 들어있습니다.
참고로 한글을 작성하기 위한 HangulMaker는 Keyboard 제작을 기반으로 하기 때문에 InputConnection을 통한 commit만을 다루고 있습니다.(만약 다른 용도로 사용하실 계획이라면 커스텀 하셔야 합니다.)
private var cho: Char = '\u0000'
private var jun: Char = '\u0000'
private var jon: Char = '\u0000'
private var jonFlag:Char = '\u0000'
private var doubleJonFlag:Char = '\u0000'
var junFlag:Char = '\u0000'
private val chos: List<Int> = listOf(0x3131, 0x3132, 0x3134, 0x3137, 0x3138, 0x3139, 0x3141,0x3142, 0x3143, 0x3145, 0x3146, 0x3147, 0x3148, 0x3149, 0x314a, 0x314b, 0x314c, 0x314d, 0x314e)
private val juns:List<Int> = listOf(0x314f, 0x3150, 0x3151, 0x3152, 0x3153, 0x3154, 0x3155, 0x3156, 0x3157, 0x3158, 0x3159, 0x315a, 0x315b, 0x315c, 0x315d, 0x315e, 0x315f, 0x3160, 0x3161, 0x3162, 0x3163)
private val jons:List<Int> = listOf(0x0000, 0x3131, 0x3132, 0x3133, 0x3134, 0x3135, 0x3136, 0x3137, 0x3139, 0x313a, 0x313b, 0x313c, 0x313d, 0x313e, 0x313f, 0x3140, 0x3141, 0x3142, 0x3144, 0x3145, 0x3146, 0x3147, 0x3148, 0x314a, 0x314b, 0x314c, 0x314d, 0x314e)
우선 현재 이루어진 변수로 사용할 초성(cho), 중성(jun), 종성(jon)과 초성, 중성, 종성에 입력 가능한 유니코드를 리스트로 선언합니다. Flag는 이중모음, 이중자음을 처리하기 위한 변수입니다.
protected var state = 0그리고 첫번째 이미지에 해당하는 상태를 정의할 변수를 선언합니다.
fun clear(){
  cho = '\u0000'
  jun = '\u0000'
  jon = '\u0000'
  jonFlag = '\u0000'
  doubleJonFlag = '\u0000'
  junFlag = '\u0000'
}
다음으로 0번 상태로 초기화할 clear함수를 작성합니다.
fun makeHan():Char{
        if(state == 0){
            return '\u0000'
        }
        if(state == 1){
            return cho
        }
        val choIndex = chos.indexOf(cho.toInt())
        val junIndex = juns.indexOf(jun.toInt())
        val jonIndex = jons.indexOf(jon.toInt())

        val makeResult = 0xAC00 + 28 * 21 * (choIndex) + 28 * (junIndex)  + jonIndex

        return makeResult.toChar()
    }
그리고 초성, 중성, 종성 조합으로 만들 수 있는 한글 문자를 리턴하는 makeHan함수를 작성합니다. 만약 초성으로만 이루어진 문자라면 필드에 있는 cho를 리턴해야 합니다. 초성만을 가진 문자는 연산을 통하면 전혀 다른 문자로 변합니다.
open fun commit(c:Char){
        if(chos.indexOf(c.toInt()) < 0 && juns.indexOf(c.toInt()) < 0 && jons.indexOf(c.toInt()) < 0){
            directlyCommit()
            inputConnection.commitText(c.toString(), 1)
            return
        }
        when(state){
            0 -> {
                if(juns.indexOf(c.toInt()) >= 0){
                    inputConnection.commitText(c.toString(), 1)
                    clear()
                }else{//초성일 경우
                    state = 1
                    cho = c
                    inputConnection.setComposingText(cho.toString(), 1)
                }
            }
            1 -> {
                if(chos.indexOf(c.toInt()) >= 0){
                    inputConnection.commitText(cho.toString(), 1)
                    clear()
                    cho = c
                    inputConnection.setComposingText(cho.toString(), 1)
                }else{//중성일 경우
                    Log.d("thisBlock==", "true")
                    state = 2
                    jun = c
                    inputConnection.setComposingText(makeHan().toString(), 1)
                }
            }
            2 -> {
                if(juns.indexOf(c.toInt()) >= 0){
                    if(doubleJunEnable(c)){
                        inputConnection.setComposingText(makeHan().toString(), 1)
                    }
                    else{
                        inputConnection.commitText(makeHan().toString(), 1)
                        inputConnection.commitText(c.toString(), 1)
                        clear()
                        state = 0
                    }
                }
                else if(jons.indexOf(c.toInt()) >= 0){//종성이 들어왔을 경우
                    jon = c
                    inputConnection.setComposingText(makeHan().toString(), 1)
                    state = 3
                }
                else{
                    directlyCommit()
                    cho = c
                    state = 1
                    inputConnection.setComposingText(makeHan().toString(), 1)
                }
            }
            3 -> {
                if(jons.indexOf(c.toInt()) >= 0){
                    if(doubleJonEnable(c)){
                        inputConnection.setComposingText(makeHan().toString(), 1)
                    }
                    else{
                        inputConnection.commitText(makeHan().toString(), 1)
                        clear()
                        state = 1
                        cho = c
                        inputConnection.setComposingText(cho.toString(), 1)
                    }

                }
                else if(chos.indexOf(c.toInt()) >= 0){
                    inputConnection.commitText(makeHan().toString(), 1)
                    state = 1
                    clear()
                    cho = c
                    inputConnection.setComposingText(cho.toString(), 1)
                }
                else{//중성이 들어올 경우
                    var temp:Char = '\u0000'
                    if(doubleJonFlag == '\u0000'){
                        temp = jon
                        jon = '\u0000'
                        inputConnection.commitText(makeHan().toString(), 1)
                    }
                    else{
                        temp = doubleJonFlag
                        jon = jonFlag
                        inputConnection.commitText(makeHan().toString(), 1)
                    }
                    state = 2
                    clear()
                    cho = temp
                    jun = c
                    inputConnection.setComposingText(makeHan().toString(), 1)
                }
            }
        }
    }
가장 중요한 commit함수입니다. commit함수는 0~3의 상태와 들어온 문자의 초중종성 여부에 따라 다르게 처리하도록 작성되어 있습니다.(만약 처리가 안되는 문자가 있다면 댓글 부탁드립니다..!)
open fun directlyCommit(){
        if(state == 0){
            return
        }
        inputConnection.commitText(makeHan().toString(), 1)
        state = 0
        clear()
    }
다음으로 커서 이동, 띄어쓰기, 한/영 키보드 변경과 같은 이벤트가 발생했을 시 setComposingText상태의 문자를 commit하는 directlyCommit입니다.
open fun delete(){
        when(state){
            0 -> {
                if (Build.VERSION.SDK_INT >= Build.VERSION_CODES.N) {
                    inputConnection.deleteSurroundingTextInCodePoints(1,0)
                }
                else{
                    inputConnection.deleteSurroundingText(1, 0)
                }
                inputConnection.commitText("",1)
            }
            1 -> {
                cho = '\u0000'
                state = 0
                inputConnection.setComposingText("", 1)
                inputConnection.commitText("",1)
            }
            2 -> {
                if(junFlag != '\u0000'){
                    jun = junFlag
                    junFlag = '\u0000'
                    state = 2
                    inputConnection.setComposingText(makeHan().toString(), 1)
                }
                else{
                    jun = '\u0000'
                    junFlag = '\u0000'
                    state = 1
                    inputConnection.setComposingText(cho.toString(), 1)
                }
            }
            3 -> {
                if(doubleJonFlag == '\u0000'){
                    jon = '\u0000'
                    state = 2
                }
                else{
                    jon = jonFlag
                    jonFlag = '\u0000'
                    doubleJonFlag = '\u0000'
                    state = 3
                }
                inputConnection.setComposingText(makeHan().toString(), 1)
            }
        }
    }
마지막으로 이전 상태로 돌아가는 delete함수 입니다. delete함수 또한 commit함수와 마찬가지로 상태와 Flag에 따른 연산을 수행합니다. 이 이외의 이중모음, 이중자음 처리는 각각의 문자에 맞게 하드코딩하였기 때문에 설명을 생략하도록 하겠습니다. 궁금하신 점이나 틀린점이 있다면 편하게 댓글 남겨주세요. 감사합니다.
'IT 프로그래밍-Android' 카테고리의 다른 글
| [Android] 키보드 앱 만들기 후기 (12) | 2019.11.20 |
|---|---|
| [Android]커스텀 키보드 만들기(4/4) - 천지인 키보드 만들기 (0) | 2019.11.12 |
| [Android] 커스텀 키보드 만들기(3/4) - 쿼티 키보드 만들기 (7) | 2019.11.08 |
| [Android] 커스텀 키보드 만들기(2/4) - 영문 키보드 만들기 (1) | 2019.11.05 |
| [Android]커스텀 키보드 만들기(1/4) - InputMethodService (7) | 2019.11.05 |